Showing posts with label recipes. Show all posts

Friday, February 26, 2010

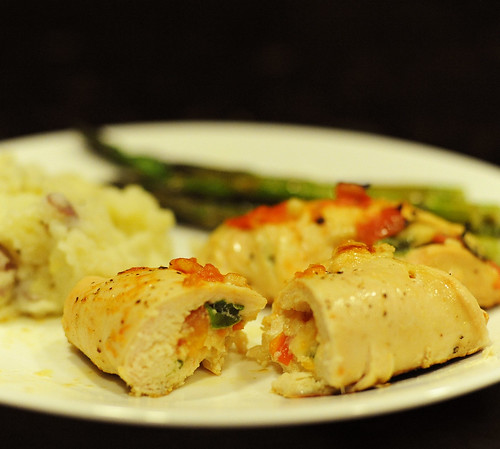
creamy chicken enchiladas.

a recipe, as promised.
DSC_1624

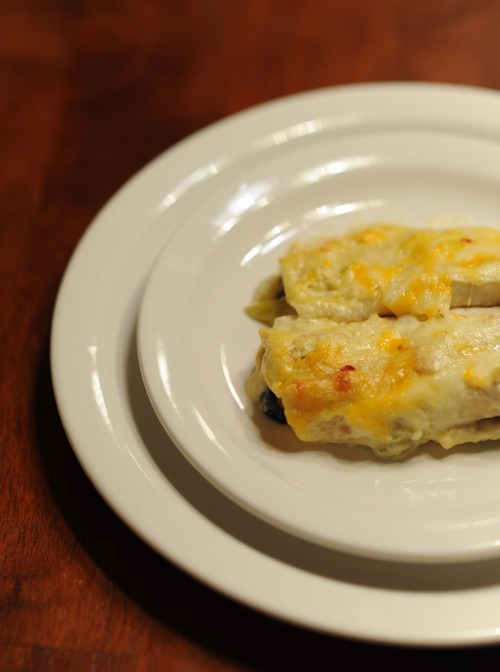
[ps. they look and taste WAY better in real life than what it looks like in this picture. it's really hard to get good pictures of food when you and 2 grown men are starving].

my mom used to make this for dinner when we were growing up, but for some reason i didn't like them then, i don't know why. so my mom stopped making them as much [my sister still blames me]. and because she stopped making them, i never really got to try them as an adult, now that i actually know what good food tastes like. 

until, over the summer, i went to visit my boyfriend's family and his mom made them for sunday dinner. i couldn't tell her that i didn't like them, it would be rude and everyone would think i was weird. so i decided i would just eat them as best i could and fake a smile. but you know what? i actually liked them. it was a really exciting day for me.

then last week, i was craving chicken enchiladas like you would not believe. i e-mailed my mom for her recipe, but apparently she doesn't have one. she just throws stuff in as she goes. so that's what i did - with the help of my friend justin.

here's what you'll need:
12 tortillas
4 boneless skinless chicken breasts
1 lb. container sour cream
2, 10 oz. cans of cream of chicken soup
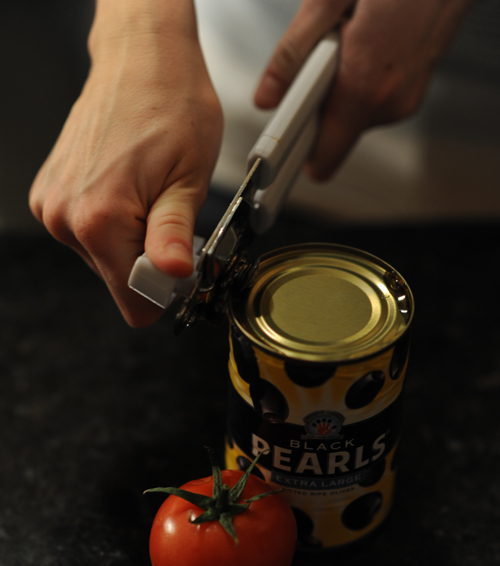
1 can olives
9 oz. diced green chiles
3 c. grated cheese

first, preheat your oven to 375 degrees.
DSC_1465

then, boil your chicken breasts. i had never boiled chicken before this, but it was so easy and they turned out so tender and delicious. boil for 10-15 minutes, until cooked all the way through.
DSC_1274

if you use frozen chicken breasts, like we did, you may have to cook them for closer to 20 minutes. because if they look like this, they're not done.
DSC_1290

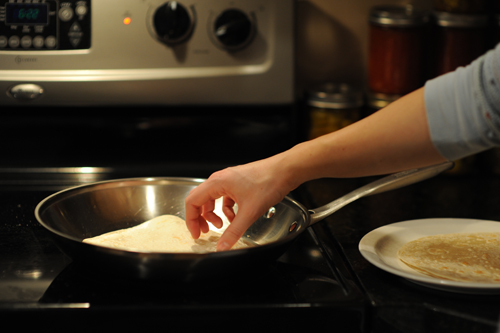
feel free to use already cooked tortillas. but as for me, i love love love the raw tortillas that you have to cook yourself. so while the chicken was boiling, i cooked up 12 tortillas.
DSC_1270

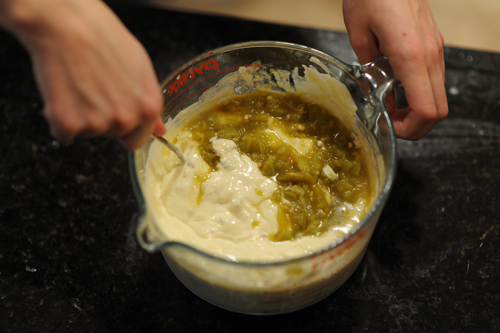
next, you'll want to mix together the sour cream and the 2 cans of cream of chicken soup.
DSC_1307

then, add the green chiles. we used a 2oz. and a 7oz. can, and the spiciness was moderate. feel free to add more or less, depending on how spicy you would like your enchiladas to be. [i might add more next time].

and make sure you get lots of pictures of stirring in green chiles, because it is apparently exciting.
DSC_1328
DSC_1329
DSC_1332
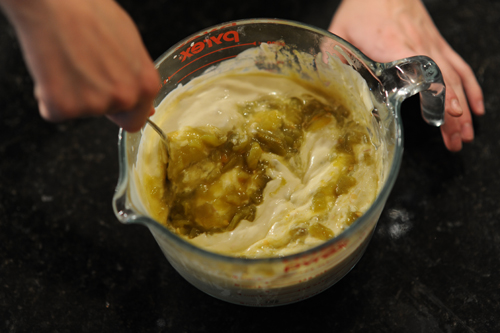
once this is stirred through, put about a cup of it aside to spread across the top later.

struggle opening a can of olives. or open it easily, it works either way.
DSC_1318

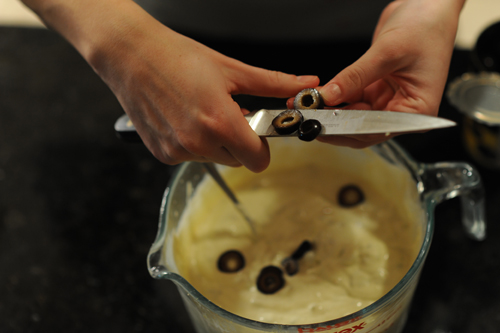
slice the olives, and stir them into the filling mixture.
DSC_1369
DSC_1391

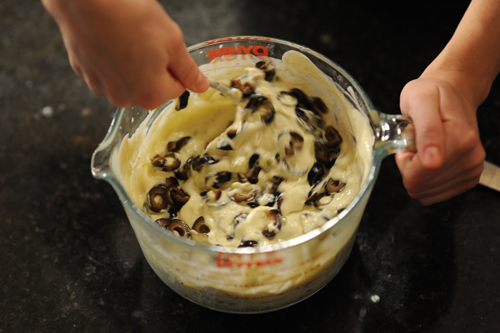
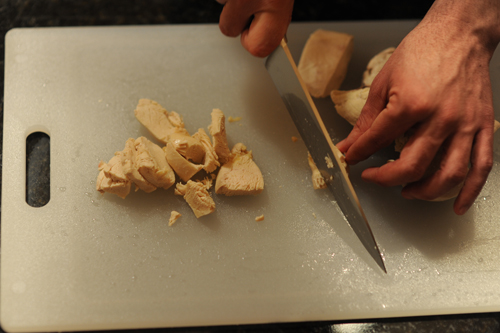
then, slice the chicken into bite size pieces, and stir them into the mixture as well.
DSC_1346
DSC_1425

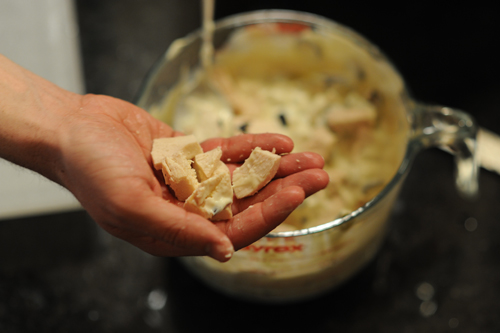
now to the last, and most important, part. cheese. grate 3 cups of cheese - we used medium cheddar and pepperjack. mmm, pepperjack. only pour 2 of the 3 cups into the filling mixture; you'll use the remaining cup to spread across the top. stir it up and the filling is done!
DSC_1254
DSC_1451

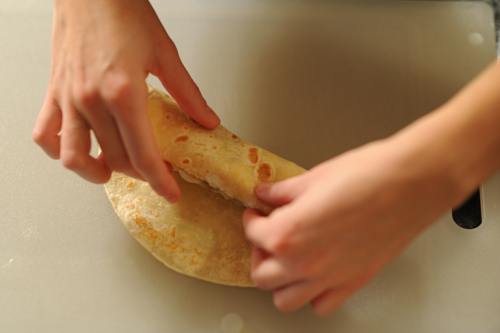
put about this much mixture inside each tortilla.
DSC_1495

fight a little bit over who gets to roll them up.
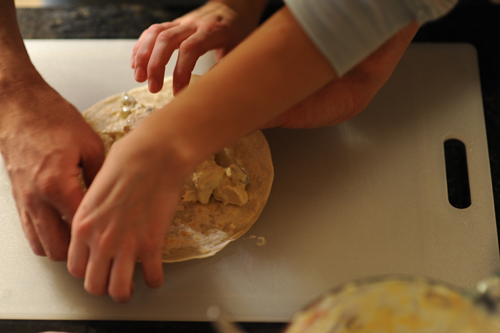
DSC_1521

[i won. obviously].
DSC_1478

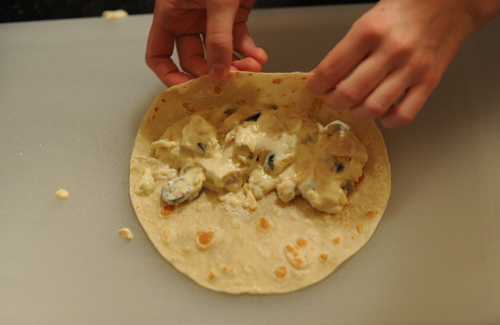
roll up the enchilada.
DSC_1539

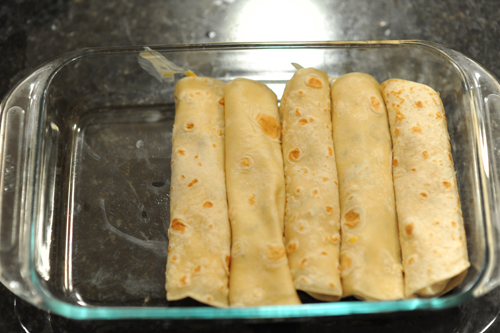
and place it in a glass pan.
DSC_1543

once the pan is full, spread the filling across the top - the cream cheese, cream of chicken soup, and green chile mixture you saved earlier. (sorry, we forgot to take a picture of that step).

then, sprinkle atop the cup of cheese you saved. yum.
DSC_1547

put pan into the oven at 375 for 35 minutes.
DSC_1551

my mouth is watering.

our 8x11 glass pan only fit 9 of the tortillas, but our filling made enough to fill 12. so we cooked the extra 3 in a little glass bread-sized pan. 

and just fyi, these heat up to make amazing leftovers, and you can even freeze them, unthaw them, and bake them another day if you feel like making more than one batch.

happy cooking :)

Thursday, January 21, 2010

grilled cheese reinvented.

grilled_cheese
[photo taken by me. you better believe it. how are my food styling skills coming along?]


the best thing since grilled cheese sandwiches...

is a grilled cheese sandwich made on sourdough bread.

with pepperjack cheese.

avocado.

bacon.

and apple slices.

yes, apple slices.

i am obsessed.


Friday, December 11, 2009

brunch at our house.

quiche
sometimes we have quiche and drink egg nog out of wine glasses.


it's romantic.

for the fabulous quiche recipe i used, go here. my sister is a culinary genius.


Wednesday, November 11, 2009

southwestern chicken chowder.

chicken_chowder

the food styling in this picture is terrible. that's what happens when you have 5 minutes to snap a photo before you need to leave for the airport, and you know the rest of the soup will definitely be gone by the time you get back.

over the summer, i went to a friend's birthday dinner at the california pizza kitchen restaurant. i was so hungry that i ordered a bowl of soup to tide me over until my pizza was ready. they came out at the same time. but after one bite of the soup, i was not even mad. 

since the weather started turning cold, i started craving this chowder. so i tried to recreate it. i looked up their description on the internet, and then i found a few recipes that were pretty similar. 

attempt 1 = rice. good rice, but rice nonetheless.

attempt 2 = soupy rice. seriously! but don't worry. this time, i fixed it. and it was fabulous.

so if it's getting cold wherever you are and you feel like a spicy+creamy something to warm you up - here you go.

just a disclaimer before i start: there are 2 reasons why i will never have my own cooking show. 1) i am terrible at writing recipes - i apologize. 2) i always cut and burn myself in the kitchen. i did both while making this soup. moving along...

this is what you'll need:
2 T canola oil
1 medium white onion, peeled and diced
4 cloves of garlic, minced
1 or 2 red bell peppers, seeded and thinly sliced
1 can (4oz) fire-roasted chilies
3 small jalapeno peppers, seeded and finely chopped
paprika
cumin
chili powder
freshly ground black pepper
1-2 boneless chicken breasts, thinly sliced
2 quarts (8 cups) chicken broth
2 cups corn [i used frozen corn and it tasted fine]
3/4 cup white basmati rice
1 cup heavy whipping cream
1/2 cup flour
1 lime
10 sprigs cilantro, finely chopped
salt
corn tortillas [optional, but awesome]

1. in a large pot, saute the white onion, garlic, and red pepper in the canola oil until vegetables begin to soften. add the chilies and jalapeno peppers. then add the spices: 1 t. paprika, 1 t. chili powder, 1/2 t. cumin, 1/2 t. ground black pepper. continue to cook until vegetables are heated through.

2. add chicken, turning the pieces until they are fully cooked. or cook chicken separately and add it to the sauteed vegetables.

3. pour in 1 quart (4 cups) of chicken broth and bring to a boil. stir in the corn and rice, reducing the heat to a simmer and let cook until rice is tender [30-45 minutes].

4. chances are, the rice drank up all your soup and there is hardly any broth left. so go ahead and add the other quart (4 cups) of chicken broth. then stir in the cream and flour to thicken it up. finally, add the cilantro and the juice of 1 lime.

5. then, add more spices. depending on how spicy you want it... i pretty much just added all the spices in a second time: 1 t. paprika, 1 t. chili powder, 1/2 t. cumin, 1/2 t. ground black pepper. then, add a teaspoon or two of salt, to taste.

6. if you feel like being really cool, slice a few corn tortillas into strips and fry them in a little pot of incredibly hot canola oil. these can go on top for a little crunch and a cute garnish. feel free to throw some extra sprigs of cilantro on top too.


enjoy.

feel free to ask questions and let me know if you try it!


Thursday, October 29, 2009

pumpkin cupcakes.

pumpkin_cupcake

[yes. this is my picture. i'm working on my food styling/photography skills - what do you think?]

fall is my favorite season. maybe it's because i love all things pumpkin.

the other night, my roommate and i decided to have a little bake-fest [she's my sous chef/cooking prodigy - i love it]. 

we googled 'pumpkin cupcakes', and martha stewart's recipe was the first to pop up. let me just tell you, martha does not disappoint.

there wasn't a frosting recipe, so i took the liberty of using a cream cheese frosting recipe that i now have memorized. excellent choice on my part, if i do say so myself.

[the recipe makes about 20 cupcakes. i had to make another batch so i could take some pictures].

martha stewart's pumpkin cupcakes
2 c. flour
1 t. baking soda
1 t. baking powder
1 t. coarse salt
1 t. ground cinnamon
1 t. ground ginger
1/4 t. nutmeg
1/4 t. ground allspice
1 c. packed brown sugar
1 c. sugar
1 c. (2 sticks) butter, melted and cooled
4 large eggs, lightly beaten
1 can (15 oz) pumpkin puree
directions:
1. preheat oven to 350 degrees. line cupcake pans with paper liners. set aside. in a medium bowl, whisk together flour, baking soda, baking powder, salt, cinnamon, ginger, nutmeg, and allspice. set aside. [don't worry if you don't have all the right spices. we didn't have allspice, so i just doubled the amount of nutmeg].
2. separately, whisk together, brown sugar, granulated sugar, butter, and eggs. add dry ingredients, and whisk until smooth. [i apparently can't read recipes, and just softened my butter instead of melting it - it still worked great]. whisk in pumpkin puree. [the recipe calls for 15 oz. of pumpkin puree, which is actually half of of the cans of pumpkin you find at most stores].
3. divide batter evenly among liners, filling each about halfway to 3/4 full. bake approximately 20 minutes, until toothpick comes out clean. [in my oven it was almost exactly 20 minutes].


cream cheese frosting
1/2 c. butter, softened
1 pkg. (8 oz.) cream cheese, softened
1 t. vanilla
3 1/2 c. powdered sugar
directions:
cream butter and cream cheese together until smooth. add vanilla. then add powdered sugar. it will be too thick to use regular beaters after you add the powdered sugar, just fyi. hope you have a kitchenaid. or you don't mind using your muscles. i pipe my frosting out of a re-usable featherweight piping bag i purchased at michael's. and this recipe makes exactly the right amount needed to frost one batch of these cupcakes.

enjoy!


xoxo.
jana

ps. i weighed less the day after i made these. they're magic cupcakes.


Wednesday, October 21, 2009

baked rigatoni.

baked_rigatoni
remember how i dreamt about pasta?


well, after i woke up, i thumbed through the better homes and gardens cookbook my roommate left on our kitchen counter and found the pasta of my dreams. [and by pasta of my dreams, literally, i mean i found a pasta recipe exactly like what i had dreamt].

so i made it for dinner.

it was amazingly delicious for how simple it was to make. really. 

i have a fabulous cook of a friend who i wanted to try it so i could have an expert's opinion. he said he gave himself a stomach ache from eating it so fast - that's how good it was.

i also had the best intentions of taking some beautifully styled photos of the meal as well - which didn't happen. we ate it too fast. i was lucky i even got one. oh well, there's always next wednesday!

here's the recipe:
7 ounces dried cavatelli or wagon wheel pasta [i used rigatoni. which is why i changed the recipe name]
12 ounces uncooked italian sausage, sliced 1/2 inch thick
3/4 cup chopped onion [1 medium]
2 cloves garlic, minced
1 26-ounce jar pasta sauce
1 cup shredded mozzarella cheese [or more than a cup. whatever]
1/4 teaspoon black pepper

1. cook pasta according to package directions. drain. set aside

2. in a large skillet, cook the sausage, onion, and garlic until sausage is brown. remove from skillet. drain. [my amazing cook friend told me that if you boil the sausage first, it is easier to slice before browning. i'll have to try that next time].

3. in a large bowl, stir together pasta sauce, 3/4 cup of the mozzarella cheese [or more than that], and the pepper. add the cooked pasta and the sausage mixture. stir gently to combine. spoon the mixture into a 2-quart casserole dish.

4. bake, covered, in a 375 degree oven for 25 to 30 minutes or until nearly heated through [you'll know when it's ready because the edges will be bubbling]. uncover; sprinkle the remaining 1/4 cup mozzarella cheese [or more than that - i like cheese. leave me alone]. bake about 5 minutes more until cheese is melted.

and voila - thank you better homes and gardens!


ps. you can still enter the giveaway below.

Wednesday, October 14, 2009

sugar cookies.

pumpin_cookie

as promised...

the most fantastic sugar cookies on the face of this earth.

you may have seen these before on my blog here or here. so i figured it was due time to share the recipe [the cookies in these other posts actually look better than the pumpkins. just sayin].

also, as promised, where they came from: a good church friend from california taught us how to make these when i was in high school - and i will love her forever.

deb child's sugar cookies
2 c. butter
1 1/2 c. sugar
4 egg yolks
2 t. vanilla
4 1/2 c. flour

icing
2 lb. bag of powdered sugar
3 T. powdered meringue
1 t. clear vanilla
1 t. butter flavoring
1/2 t. almond flavoring (optional)

for cookies:
first, cream butter and sugar. then, add egg yolks and vanilla. add flour to mixture gradually. the  dough will roll out best if it has been chilled for a few hours. roll out cookie dough to 1/4-1/2 inch thick, and cut into desired shapes. place cookies on a buttered cookie sheet or a cookie sheet covered with parchment paper. bake at 350 for 10-12 minutes.

icing:
mix ingredients. [seriously, that's about it]. Add water to the mixture incredible slowly, until the icing is at the proper consistency for piping through a bag - but it should still be pretty thick. then, feel free to add some color.

and here are some tips.
it's preferable not to do everything at once. when i try to finish these up all in one day, i start to go crazy and the icing job shows it. maybe make up the cookie dough one day and bake and frost them the next. or cook them with a helper - it makes life a lot easier.

i roll my cookies out thick - like 1/2 inch thick - before cutting the dough into desired shapes. they taste better that way.

watch your oven to figure out the exact cooking time. i take my cookies out when they just barely start thinking they want to look the least bit golden on the edges. they'll be softer and more awesome and last longer.

and here's the biggest tip of all - icing. it looks hard, right? wrong. use a piping bag to frost an outline on your cookie - i frost all of my outlines at once. then, thin the remaining icing with water [it doesn't take very much]. use this thin icing with a spoon to fill the inside of the cookies that have already been outlined - that's how the frosting gets so smooth. and if you have any piping icing left, use it for further cookie decoration.

let the icing dry overnight. trust me. then wrap them up, or serve them at a party and impress all your friends.

happy baking!


xoxo.
jana

if i'm a terrible instruction giver, please feel free to tell me and ask questions :)

Tuesday, October 13, 2009

get excited.

german_chocolate2

yes, i am up way too late.

i'm blaming it on the fact that i fell asleep on my couch today in the middle of the afternoon. i didn't mean to, i just did. 

and you know what i dreamt about? 

pasta.

i know, it was a little weird. but it made me want to cook. and take pictures of food. and share the love with you. which i'm going to do... starting tomorrow. 

here come recipes on wednesdays.

it's gonna be big.


xoxo.
jana

ps. i'm sure they're mostly going to be recipes i steal from other people. like my sister. but don't worry, i'll always tell you where they really came from.

pss. it's raining outside. i love it.

psss. yes, i wear animal prints. no, it's not always trashy.

Monday, May 4, 2009

today i may have eaten nothing but banana cake

with cream cheese frosting.

DSC_2943

ok, i had a real lunch. but other than that, it was only banana cake.

try the recipe, and you will understand. don't even worry if you're not a huge banana fan, you will love it anyway. my mom sent it to me - she found online after i told her i needed a banana cake recipe. and i'm going to share it with the blog world because i love you.


cake ingredients:
1 1/2 c. bananas, mashed, ripe
2 t. lemon juice
3 c. flour
1 1/2 t. baking soda
1/4 t. salt
3/4 c. butter, softened
2 1/8 c. sugar
3 large eggs
2 t. vanilla
1 1/2 c. buttermilk

frosting:
1/2 c. butter, softened
1 (8 oz.) package cream cheese
1 t. vanilla
3 1/2 c. powdered sugar


directions:
1. you should probably start with a clean kitchen. why? because it will end up looking like this, or worse.
DSC_2926
so the cleaner you start with, the better.
2. realize that this recipe requires baking with faith. mostly because it's really weird and kind of intense, and you have no idea why you're mixing things the way it says to mix them. but have faith that following the recipe will bring you happiness, and you will be fine.
3. preheat the oven to 275.
4. in a small bowl, mixed mashed banana with lemon juice.
5. in a medium bowl, mix flour baking soda and salt.
6. in a large bowl, cream 3/4 butter and sugar until light and fluffy.
[i have no idea why it's 2 1/8 c. sugar. really, an 1/8 cup? i've never seen that before, ever. but just do it]
7. beat in eggs, one at a time, then stir in vanilla.
[want to know why you beat in the eggs one at a time? yeah, me too. it's a mystery. at least to me, anyway]
8. beat in the flour mixture alternately with the buttermilk
[i didn't use buttermilk, i just added a little lemon juice to regular milk since i already had lemons on hand. and don't ask why you add them in alternately because i have no idea. just have faith, remember?]
9. stir in banana mixture.
10. taste it. because it's awesome, and the chances of getting salmonella from raw eggs is incredibly rare if you only have a spoonful. or even a few spoonfuls. trust me, i looked it up.
10. butter and flour a 9x13 pan. or 3 9-inch round pans if you want to be cool like me.
11. pour batter into prepared pan, or pans. if you go with the 9x13, bake in preheated oven for 1 hour or until toothpick inserted in center comes out clean. the 9-inch cakes baked for 45 minutes even in my oven. the toothpick rule still applies. and here is a picture of them baking in the oven in case you wanted to know how it's supposed to look.
DSC_2928
12. remove from oven and place directly in freezer for 45 minutes. 
[ooh ooh, i actually know why you do this one! it makes the cake moist and fabulous!]
13. WARNING: there is only one teeny tiny hiccup with the recipe, and it really only matters if you decided to walk on the wild side and make a 3-layer cake. the cakes don't necessarily come out of the pan super easily, even if you butter and flour the pan like mad. after i took them out of the freezer, i actually used the other side of a spoon to slide under the cake to separate it from the pan. it kind of seems like the cake may fall apart, but if you're really careful it will come out of the pans in mostly one piece. and you cover it in frosting so it really doesn't matter how it looks.
14. for the frosting, cream the butter and cream cheese until smooth.
[again, if went the 3-separate cake route. you may want to double or 1 and a half the frosting recipe so you don't have to worry about spreading it too thin]
15. beat in vanilla.
16. add powdered sugar and beat on low speed until combined, then on high speed until frosting is smooth
17. spread on cooled cake. don't even bother making it look pretty. ok, you can make it look pretty if you're making it for a party. but if you're planning on cutting a piece out 2 seconds after it's done being frosted - like me - you won't have the patience to make the frosting perfect.
18. eat at least a piece, probably two though. i personally like it without ice cream.
19. after you're satisfied, go to an awesome church conference with your favorite roomie.
DSC_2944
[i love camera timers]
20. the next morning, make sure you have a piece for breakfast.
21. and maybe just leave a fork next to the cake so you can take a bite whenever you feel so inclined. which might be every time you walk past the kitchen. i would never do that, but my friend does. ok fine. it's me, not my friend.
22. when you realize you've eaten nothing but cake all day, go play a game of kickball for family home evening with your ward, and tell some people to come over and have a piece before you finish the other half of the cake off yourself.
DSC_2954
23. don't hate me if you do finish the other half off yourself.
24. please tell me if you try the recipe - i can't wait to hear how much you love it!

the end.

Wednesday, January 14, 2009

chicken stuffed with mozzarella. tomatoes + spinach

DSC_8733


lucky for me, my mom is one of my faithful blog readers, i think i have 2 :) ... so she was sure to see my list of resolutions for the new year, especially the goal to cook one meal a week – and she is holding me to it.

last night, i had a really good idea of what i wanted to make, but after browsing the foodnetwork.com for recipes and having no luck, i realized that i was going to have to do it without any help.

i am pleased to report that it turned out fabulous! here’s what i did [in case you can’t think of anything to make for dinner tomorrow].

first, i cut a few chicken breasts in half, so they were the same shape as the original piece of chicken, only half as thick. i laid all my pieces of chicken on a cookie sheet covered in tin foil.

then, on the center of each piece of chicken, place the mozzarella cheese, chopped spinach, and diced tomatoes and garlic (i sautéed mine separately just before because i like my tomatoes thoroughly cooked, but that step isn’t necessary for most normal people. i’m just not normal). stuff chicken as full as possible. then fold the chicken over, whichever way is easiest, and use toothpicks to hold chicken in place, if necessary. brush a mixture of olive oil, salt, and pepper on the outside of the chicken, both top and bottom. you could do this before you stuff the chicken too, now that i think about it.

bake at 425˚ for about 25 minutes.

a few minutes before my i pulled the chicken out of the oven, i spread the remaining tomato + garlic mixture over the top of each chicken breast. also, i wasn’t quite sure if the chicken was all the way done (especially on the bottom) so i cooked it on the stove for just a few more minutes in the pan i had used for the asparagus, just to be safe.

once the chicken is finished, remove toothpicks and enjoy!

hopefully i didn’t make it sound very difficult – it was actually really easy, and it only takes about an hour from start to finish unless you’re sadly slow at cooking like me. 

let me know if you try it and tell me how it turns out!

DSC_8726

in case you were wondering, i served the chicken with red garlic mashed potatoes and asparagus sautéed in olive oil and one lemon’s worth of juice. [next time, i’ll use less lemon].

happy cooking!!